Tuesday, May 27, 2008

Pasta Fagioli Soup


I've never been been one to eat minestrone but I do like this recipe and with all the pasta, beans, and other stuff going on it's not too heavy on the tomato broth. Pasta e fagioli means "pasta and beans" and I believe most traditional fagioli recipes use cannelloni beans so I'm not sure Cooking Light got the name entirely right here. Regardless, it's pretty good and Allen now calls it his favorite of our soup recipes it that means anything to you. It's tasty, super easy to make and it does have a lot of fiber and it's a good way to get me to eat some zucchini (though I prefer zucchini bread).

12 ounces Santa Fe chicken sausage, halved lengthwise and sliced (such as Amy's) -- this is what the recipe says but I haven't found any Amy's in the store. I have bought sausage at CM that's worked and spicy Italian sausage too.
3 cups fat-free, less-sodium chicken broth
1/2 cup uncooked pasta shells (I use the baby shells)
2 cups coarsely chopped zucchini (about 2 small zucchini) -- I had some extra yellow squash one night and threw it in and it also works.
1 (14.5-ounce) can stewed tomatoes, undrained
1 teaspoon dried basil
1 teaspoon dried oregano object
1 (15-ounce) can kidney beans, rinsed and drained
1/3 cup (about 1 1/2 ounces) shredded Asiago cheese

Instructions: Heat a large saucepan over high heat. Add sausage; cook 2 minutes, stirring constantly. Add broth and pasta; bring to a boil. Cover, reduce heat, and simmer 4 minutes. Add zucchini and tomatoes; bring to a boil. Cover, reduce heat, and simmer 2 minutes. Stir in basil, oregano, and beans; cover and simmer for 3 minutes or until pasta and zucchini are tender. Sprinkle with cheese.

Yield
5 servings (serving size: about 1 1/3 cups soup and about 1 tablespoon asiago cheese)

Nutritional Information
CALORIES 319(26% from fat); FAT 9.2g (sat 3.3g,mono 3.8g,poly 0.8g); PROTEIN 21.9g; CHOLESTEROL 56mg; CALCIUM 56mg; SODIUM 858mg; FIBER 9.6g; IRON 4.4mg; CARBOHYDRATE 39.7g

Grilled Tuna Steak Burgers


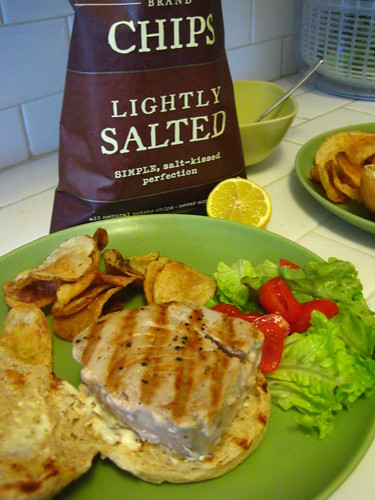
I've got to thank Fayza for this dish. When she moved to San Francisco she let me raid her freezer and I got these Whole Foods frozen Yellowfin tuna steaks. I decided to try out tuna burgers. I use to order 'em at Hyde Park Bar and Grill when I was a pescatarian but I never tried to recreate them at home. Turns out that Hyde Park's were better but this is a good do-it-yourself version. Basically you just get sandwich fix'ns and...

Ingredients
Burgers:
1/4 cup olive oil
2 tablespoons tarragon vinegar
2 small bay leaves, broken
4 ounce ahi tuna steaks

Remoulade Sauce:
1/2 cup mayo
1 tbsp lemon juice
1 garlic clove, pressed
1 tsp minced fresh Italian Parsley
1 tsp grated onion
1 tsp anchovy paste
2 hard-boiled large egg yolks
1/4 cup extra-virgin olive oil
2 tbsp capers (drained)

1. Thaw out the frozen tuna as instructed on the packaging.
2. Combine oil, vinegar, and bay leaves in a plastic bag, shake to blend, add tuna and chil for 1-2 hours turning the bag occasionally.
2. Grill them on each side in a sprayed pan or on the grill until it's no longer too pink inside. A few minutes on each side.
You can heat the bun and throw it together like a burger with mayo and all the fixins. Or, mix up the remoulade sauce.

For sauce: Wisk first 6 ingredients in bowl to blend. Useing fine grater, grade egg in yolks. Whisk in oil, then capers. Season with Salt and pepper.

This is an epicurious.com recipe!

Wednesday, May 21, 2008

Apple Radish BBQ Ribs


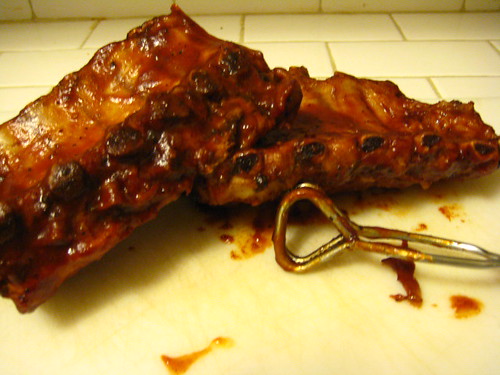
Again, thank me later. Or maybe just start checking out allrecipes.com because this is another winner I got from that site. I never really ate baby back ribs before trying out this recipe and now I only eat them at home because I don't think they'll get any better. It's about $12 for a rack of ribs at the store and with some mashed potatoes and a salad or green on the side I can't think of a better dinner.

4 pounds pork spare ribs (I just get a rack)
2 pounds apple juice (I just get a large plastic jug.)
3 cups barbecue sauce (I just get the largest size...2 plus cups)
1/2 cup prepared horseradish
3 tablespoons Worcestershire sauce
1 teaspoon garlic salt

Instructions:
1. Place ribs in a stock pot, and cover with apple juice. Bring to a boil, reduce heat, and simmer for 1 to 2 hours. Preheat oven to 350 degrees.

2. In a medium bowl, mix together barbecue sauce, horseradish, Worcestershire sauce, and garlic salt. Stir in 3 tablespoons of the apple juice from the ribs.

3. Brush underside of ribs with 1/3 of the sauce. Turn them over, and place in roasting pan. Brush tops with remaining sauces.

4. Bake in preheated oven for 25 to 35 minutes, brushing occasionally with sauce.

P.s. It helps to put down a layer of aluminum foil in your roasting pan (I use a pyrex) so you don't have to work on cleaning out the baked-on sauce that inevitably pools in your pan.


Monday, April 7, 2008

Coconut Curried Prawns

I got a new cookbook! The Melting Pot. The World in Your Kitchen Each chapter of the book highlights a different country and nationality (Malaysian, Chinese, Ethiopian) and gives you an introduction to the cuisine, flavors you'll find in the kitchen, and, of course, offers recipes. I like the aspects of learning the contents of an Estonian store cupboard and lessons learned along the way when discovering Perisan cooking but I'm not a fan converting measurements from metric to imperial (note to self: do not buy English cookbooks).


The Coconut Curried Prawns recipe came from the Caribbean Kitchen section. Allen loves curry and coconut so I figured it was a good one to try first. He loved it. The color turned out much more yellow than the red curry pictured in the book. Regardless, we'll make it again. It's easy, rich and a bit different Caribbean style, Mon!

Ingredients:
200 g prawns (you tell me how many!) Actually, we used about 20 (or more) frozen shrimp.
1 small red bell pepper
2 cloves of garlic
A small bunch of spring onions (green onions)
5cm of ginger (I don't know what this quantity is either so I used about 1 tsp
1 scotch bonnet chili (a small colorful chili that's got a thin skin and is hot!)
1 tsp curry powder
1 can coconut milk
A small bunch of coriander (cilantro)
Salt and Pepper

Prep:
1. Clean and de-vein the prawns
2. Finely chop the red pepper, garlic, green onion, ginger and chili
3. Do not shake the can of coconut milk, open and spoon off the heavier coconut cream from the top of the can and set aside the rest of the coconut milk
4. Roughly chop the cilantro

Cook:
1. Heat a little oil and fry the red pepper, garlic, green onion, ginger and chili with the curry powder and a pinch of salt and pepper until soft and glossy
2. Toss in the prawns and cook for one minute
3. Add the coconut cream and half the milk. Turn up the heat to cook the prawns and reduce the sauce. Add milk until you get the consistency you want
4. Cook for 10 minutes and serve with freshly chopped cilantro

Very easy and, again, fairly rich. Probably a recipe best to consume in small quantities but, instead, we ate the entire meal in one sitting.

Tuesday, April 1, 2008

Bacon Wrapped Shrimp with White Cheddar Cheese Grits


I've been watching Top Chef from the get-go and just last season I decided to try out a recipe that a Chef named Tre prepared on the show. I love grits and bacon wrapped shrimp so I figured this was a win-win recipe. It turned out that the grilled corn and white cheddar grits recipe is a keeper (I made this again for a Bacon party and people liked it just fine), the bacon wrapped shrimp aren't much different than how I usually make them normally and the chipotle-tomato butter sauce isn't worth trying again. (I made it twice and it turned out the same both times. It's got a nice flavor with a bit of spice but it doesn't thicken as much as I'd like and it's not worth the effort.) From this, I figure that Top Chef recipes are probably not really tested in an actual kitchen. I mean, the grits made enough for a few dozen people!

Shrimp Prep: Season shrimp with a little Kosher salt. Using a hot grill, quickly mark each shrimp. Remove from grill and allow time to cool. Shrimp should still be uncooked. When cool enough to handle, wrap each shrimp with a half piece of bacon. Season with cracked black pepper. Sear each shrimp in grapeseed oil till crispy on both sides. Serve when rest of dish is ready.

Grits Prep:Using a deep saucepot combine chicken stock and milk. Bring to a simmer, add butter, and allow time for it to dissolve. Slowly whisk in grits a little at a time. When grits begin to thicken, lower heat. Switch to a spatula and fold in the rest of the ingredients. Adjust for addition seasonings if needed. If grits are too thick, add more chicken stock.

For the Chipotle-Tomato Butter Sauce: In a saucepot, sauté onions and garlic over medium heat. Next, add tomatoes, chipotle peppers and peppercorns. Continue to cook for another three minutes. Deglaze with chicken stock and lower heat. Cook for 5 minutes then place in a blender; blend till smooth. Place liquid back in saucepot and over low heat mount with butter, whisking in a little at a time. Add cilantro and season with lemon juice and salt. Turn off heat and allow 5 minutes to steep cilantro. Strain through fine mesh strainer and reserve warm till time to serve.


(Messy, messy, messy when your blinder lid doesn't stay on!)

To Plate:Place small amount of grits in the center of a large plate. Drizzle sauce around grits. Place three pieces of shrimp around grits. Serve. (THREE?!? Make that Nine!)

For the Shrimp:
18 pc black tiger shrimp, peeled and deveined
1/2T Kosher salt
9 bacon slices
2t cracked black pepper
Grapeseed oil for searing

For the Grits:
2qt chicken stock
1qt milk
1/4 stick unsalted butter
1qt instant grits
2 cups grilled corn kernels
1 cup poblano peppers, small diced
2 cups aged white cheddar cheese
3T chopped cilantro
2T Kosher salt
2T cracked black pepper

For the Chipotle-Tomato Butter:
1/2 yellow onion, chopped
2T chopped garlic
3 Roma tomatoes, chopped
3T chipotle peppers (in Adobe)
1t black peppercorns
2 cups chicken stock
1/2 stick unsalted butter
1/2 bunch cilantro1 lemon, juiced
2t Kosher salt

(Not the greatest of pictures.)

Sunday, March 30, 2008

No-Knead Nutella and Roasted Hazelnut Challah


I took this recipe from Steamy Kitchen who took it from the book Artisian Bread Five Minutes a Day. I've since bought the book because I enjoyed this recipe so much. It's a bit labor intensive (we didn't get to enjoy our bread until about noon on the Saturday morning that I made it despite starting on it around 9:30 a.m. -- but most of the time is waiting and baking), a bit messy, and with buying the honey, hazelnuts (I had some leftover from the Scallops with Hazelnut Brown Butter Recipe) and Nutella it's not necessarily an inexpensive bread. But I love challah (I wonder what would happen if you made french toast with this challah!?!) and it was fun to make.

On to the recipe (taken from Steamy Kitchen):

You start by mixing the master dough first, let that rest overnight in the refrigerator, then the next day, pinch off a grapefruit sized piece of dough (1lb) to use for a loaf of Challah. Return the rest to the refrigerator to use for another day.

1 3/4 cups lukewarm water
1 1/2 tbl instant yeast
1 1/2 tbl kosher salt (1 1/2 tsp table salt)
4 lg eggs, slightly beaten
1/2 cup honey
1/2 cup unsalted butter, melted
7 cups unbleached all-purpose flour

In a large bowl, mix together the eggs, water, honey, melted butter, yeast and salt. Stir well with a wooden spoon. Add in the flour. STIR, BABY STIR!!! Stir until you don't see any more dry bits of flour. Cover (not airtight) and stick it in the refrigerator overnight, or up to 4 days. The longer you let it fart around in the refrigerator (literally!), the better tasting the dough will be.
pssst....if you want, you can let it rise for 2 hours on the counter, pinch off the dough that you need to make your Challah. However, I've found that with only a 2-hour rise, the bread isn't very flavorful. Still good, but definitely not as good as if you had let it sit 1-4 days in the refrigerator.

Nutella and Roasted Hazelnut Challah adaptation of Challah recipe from from Artisan Bread in Five Minutes a Day

1 lb of Master Challah Dough (above) about a grapefruit sized chunk of dough
4 1/2 tbl Nutellasmall handful of hazelnuts
1 egg + 1 tbl water, whisked to make egg wash

The first thing you need to do is take that master dough out of the refrigerator, grab a grapefruit sized chunk of dough. Return the rest of it to the refrigerator to use another time. Generously flour your hands and the dough. Shape the dough into a ball by stretching the surface of the dough and tucking it to the bottom all around, rotating hte ball a quarter-turn as you go. This creates a taut, smooth surface. Let the dough hang out on counter, covered with a towel to take the chill off while you roast your hazelnuts.

Roast Hazelnuts: Grab a medium sized skillet. Turn heat to medium. When hot, add hazelnuts and roast, continually moving the nuts so that they don't burn. You may want to turn your heat to medium-low if the pan gets too hot. Roast until nuts are golden brown and fragrant. Roughly chop the nuts with a sharp chef's knife and cutting board.

Braid Dough: Now, back to the dough. Use palm of your hands and roll the dough into a thick, even log. Cut the dough into 3 equal pieces with knife or dough scraper. (It's easier to cut even pieces when the dough is not round). Roll each piece with your hands to stretch into a long 1 1/2" thick rope. Try not to just stretch it out by pulling, the dough will break. Easiest way is to place dough on counter and roll back and forth with palms of hands, starting in the middle and hands move out which stretching the dough a bit. Don't worry about getting it to look pretty, just try to get each piece even sized.

Time to add the Nutella. Take one piece of dough. Use side of your hand to press and create an indent in the middle of the strand. Spread about 1 1/2 tbl of Nutella in this indent.

Bring up the sides of the dough, encasing the Nutella and pinch dough closed. Repeat with other strands. It's a bit messy and next time I'll try and make deeper, wider holes so less Nutella squirts out the top.
Pinch it up!


Time to braid. Start in the middle and braid. Pinch ends, tuck under. Now braid the other side, pinch and tuck. Start braid from the middle (instead of top) so that it tapers evenly at both ends.

Cover with towel and let rest for 1-1/2 hours. 20 minutes prior to baking, preheat your oven to 350F. When dough is ready, brush top with egg wash and sprinkle with chopped hazelnuts. Bake for 25 minutes.

It's as good as it looks!

Tuesday, March 25, 2008

Scallops with Hazelnut Brown Butter

A simple recipe that will sort of make you feel like your eating healthy. For some reason Allen wasn't a big fan of this recipe but I can't remember why (I think I just liked it so much I blocked out his criticisms)!

6 tablespoons unsalted butter
1/4 cup hazelnuts, skins removed coarsely chopped
2 teaspoons white-wine vinegar
Coarse salt and ground pepper
1 pound large sea scallops (about 12), muscles removed, cut in half horizontally
1 to 2 bunches (about 1/2 pound total) arugula (preferably baby), washed well and dried


1. In a large skillet, stirring frequently, cook butter over medium heat until golden brown and most of the foam has subsided, about 4 minutes. Immediately transfer butter to a small bowl. Stir in hazelnuts and vinegar, and season with salt and pepper. Cover hazelnut butter to keep warm, and set aside. Wipe out pan with a paper towel.

2. Season scallops generously with salt and pepper. Place same skillet over medium-high heat. When skillet is hot, cook scallops, in two batches (to avoid steaming), until browned and opaque in center, turning over once with a thin-bladed metal spatula, about 2 minutes total.

3. Divide arugula among four serving plates; top with scallops. Spoon hazelnut butter over scallops.